Thursday, April 24, 2014

Ork Looted Leman Russ - WIP

Out here in the Valley of the Sun the heat of Phoenix Arizona can have some unexpected results.  Say for example you leave your Imperial Guard army in your car one day, after a late night of wargaming.  You may return to your car in the morning to find that your Leman Russ has melted, yes... melted.  So what does one do with a horribly warped Leman Russ?  Make it a looted wagon of course! Any critiques and suggestions are welcome.  I think I'm about done with the tank itself. I am working on making some grots out of green stuff to man the sponsons and a large ork to command the tank. 


Tank traps are mounted to front of the tank using a couple of I-beams.  A battle cannon was scratch built from styrene tube and is removable to allow for weapons swaps.  An oil drum has been converted into a rocket launcher.

A deck is added to the rear end of the tank for transport.  The exhausts are rerouted around the deck.

A lascannon power pack powers a spot light. Bits of worne styrene are 'riveted' about the sides of the hull and used to decorate the front of the track guards.

Green stuff was used to create weld lines, styrene rods were bent using the heat of cigarette lighter, and guitar string connects a spotlight to the turret.

Guitar string and Imperial Guard flamer packs were used to detail the engine compartment.

Using some orky pictures for reference, I cut a few ork icons out of thin sheets of styrene.
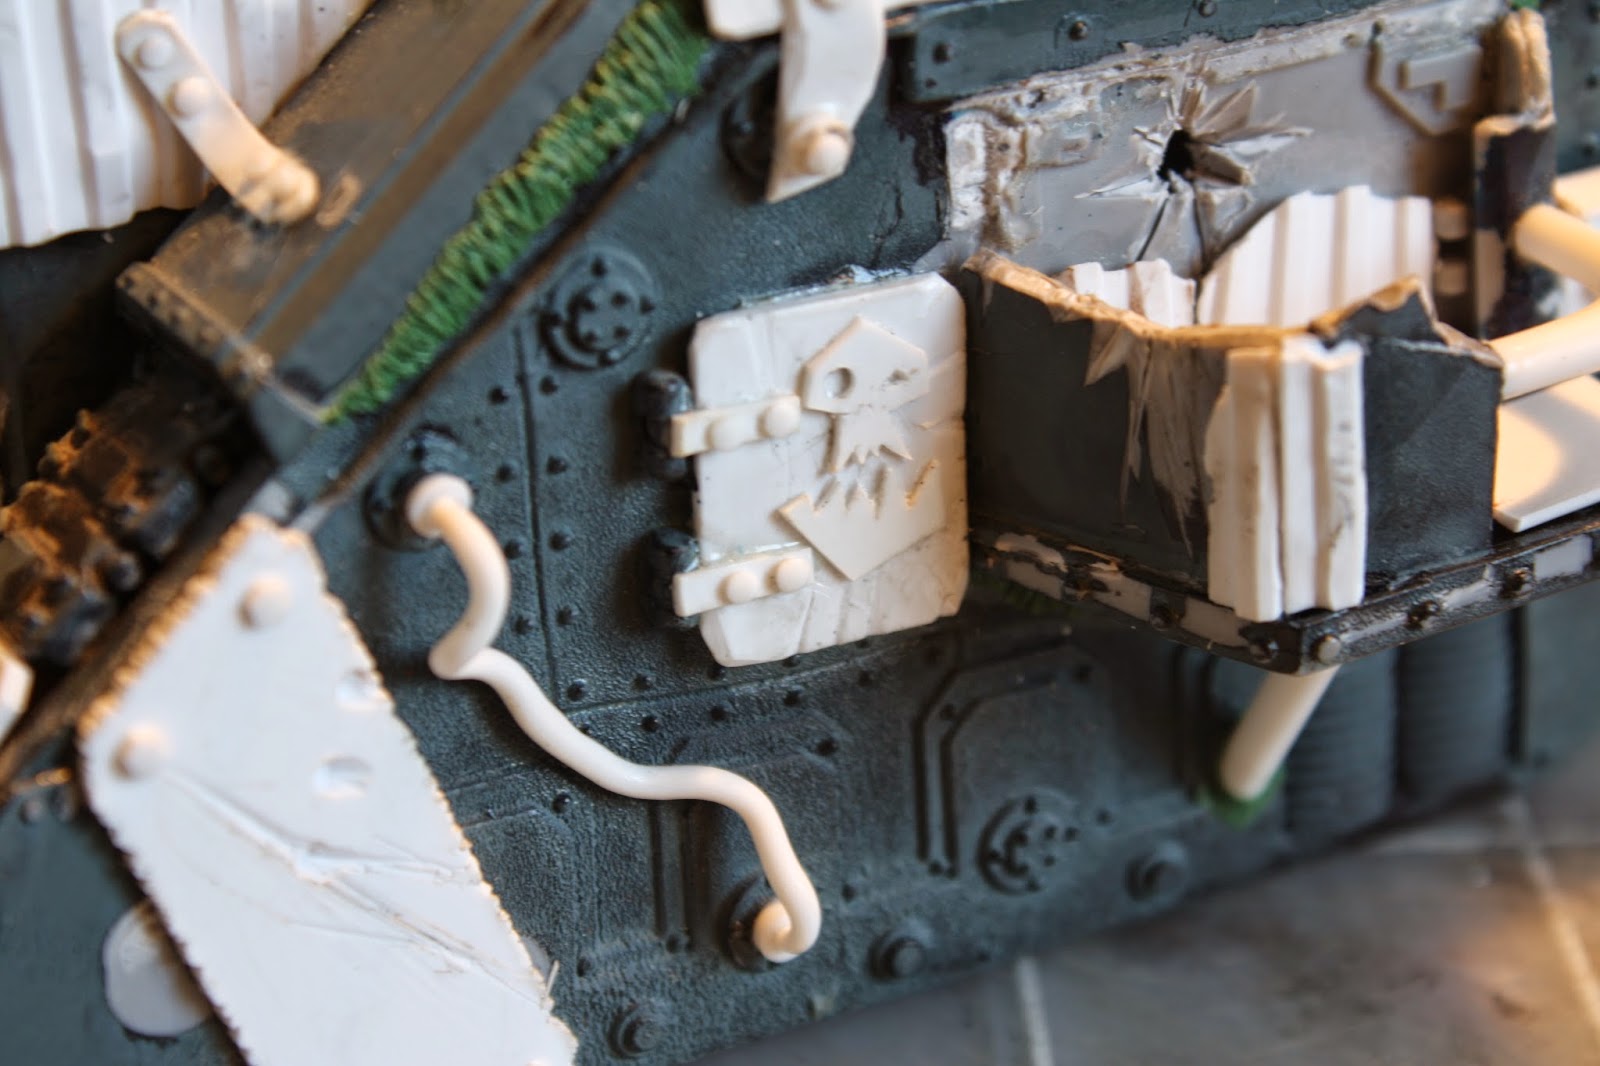
A great deal of the wear and tear inflicted on the styrene was achieved by chewing on it between my molars.

Here I swapped the driver's position and forward weapon.  I tore apart one end of a styrene tube and further bent the ends after warming them with a lighter to represent an exploded cannon barrel.

Tuesday, April 22, 2014

Tutorial - Plasma Cut Texture


Working on Orkifying a looted vehicle or want to add some repairs to battle damage on your vehicles?  You may want to give the illusion that a piece of metal was cut to size with a plasma cutter.  Here I will show you how I get that unique texture that a hand held plasma cutter will leave behind.

For this project you will need a hobby knife and some sheet styrene.  I prefer a thickness of 1mm or thicker for this.  You could use a thinner sheet but the texture we are trying to achieve will be less pronounced and harder to read.

Start by cutting off a piece of styrene to your desired size.  Perhaps you are covering a hole or adding additional armour to a tank.  Either way, make sure the piece is cut to the size and shape you want for the final piece as any resizing done later will negate all the work you did to create the texture.

Using your hobby knife, make a series of cuts running perpendicular to the styrene. I do this by tapping a fresh blade along the sides of the styrene. Do so with a slight angle and a random spacing. These cuts should not go very deep, perhaps a quarter of a millimeter. Continue this around the circumference of the piece.

Next, repeat the technique but with an opposite angle to your strokes.  As you do this you should start to see little pieces of styrene get cut away revealing slight grooves around the sides of the piece.

Repeat this process until you achieve the desired result.

Here are some examples of this technique applied to a looted Leman Russ I'm working on.


Sunday, April 20, 2014

Tutorial - Bolts and Washers


Whether one is detailing Imperial Guard... excuse me, Astra Militarum vehicles, building terrain pieces, or Orkifying some looted vehicles, details such as bolts and other fasteners are essential to bringing a finished look to your model.  Here I'll demonstrate a technique I've used to create bolts with washers.

To complete this project you will need the following:
  • hole punch (with multiple size dies)
  • hobby knife
  • sheet styrene
  • hex stock (hexagonal extruded styrene)
  • glue (plastic weld prefered over super glue)
Use your hole punch to make "washers".  Make sure that the size die you are using is larger than the hex stock.  For added detail make two sizes of "washer" for each fastener, one slightly larger than the other.

Using your hobby knife cut thin slices off of your hex stock.  These should be roughly the same thickness as the sheet styrene you used for the washers.

Here is an example of the two discs and one slice of hex.  These will become our bolt and washers.


Stack the pieces largest to smallest, using a dab of glue between each.  It is easier to place these if you apply the largest piece to the model first and then glue the remaining pieces one at a time on top of each other.  Below is an example of what the above process looks like when applied to a Grot Tank I'm working on.

Don't stop there with various sizes of extruded hexagonal styrene, styrene rod, and your hole punch, you can make all kids of different fasteners.  In the above picture, very small styrene rod was used to create rivets and a different sized hex stock was used to create additional bolt heads.


Sunday, February 16, 2014

Tutorial - Custom Lasgun Sniper Rifle


Some time back I made a set of Imperial Guard snipers with custom lasgun sniper rifles and ghillie suits.  I thought it about time to breakdown how I put those guys together.  I'll start today with a tutorial on how to make your own sniper rifles from standard Imperial Guard lasguns and some styrene tubing.

The Tools

The tools you will need are pictured above.  I recommend plastic weld over superglue.  It will provide a permanent bond but doesn't bond instantly, or to you, so you have a bit more leeway than you get with superglue.  The razor saw and miter box are not required but highly recommended.  If you plan on making frequent conversions or scratch builds you will need them eventually.  A drill and hobby knife are a must as well as a good set of various sized drill bits.  A pair of good tweezers will come in handy when placing small parts.

Materials

You're going to need some styrene tubing.  Each of the sizes shown here will be used to complete this project.
You will also need one, or more, Games Workshop Imperial Guard lasguns.  I like this version because we will be using the bayonet lug on the underside of the frame.

The Barrel

Start by removing the stock barrel from the front of the lasgun with your hobby knife.  Be careful not to remove the bayonet lug at the bottom of the frame.
After removing the barrel, drill out the former location of the barrel with a 1/16" bit.  You don't have to go very deep, just enough for the styrene tube to hold still later.
It was at this point that I also removed the small round protrusion that was just under the barrel. 
We will be using the 1/16" for the barrel and the 3/32" for the muzzle break and the heat shield.
The 3/32" tube is hollow but will need to be drilled out with a 1/16" bit to allow us to slip the muzzle break and heat shield onto the barrel.
To make the barrel, cut a section of 1/16" rod to the length of your choosing.  Remember, this is a sniper rifle so it should be relatively long in relation to the total length of the finished rifle.
The muzzle break is created by cutting a small section of the 3/32" tube off at a 45 degree angle.  For added detail, cut vents into the sides of the muzzle break.  This is easier to do with the razor saw as it is wide enough to create a groove with a single cut. When done, slip it onto the end of the 1/16" rod and glue in place.
With the main portion of the barrel complete, it needs some more detail.  Cut a section of 3/32" tube a bit short enough that when it is slipped over the barrel there will be a small section of 1/16" rod protruding from the rear, and visible between the end of the heat shield and muzzle break.
Using a 3/64" bit I drilled ventilation holes down the sides, top, and bottom of the 3/32" tube.  Make sure that the side holes are offset from the top and bottom ones so that they are placed halfway in between each other.
Slip the heat shield over the barrel and glue in place.  Now that the barrel is complete you can set it into the front of the lasgun and glue into place.It looks good, but needs more, don't you think?

Scope

What sniper rifle is complete without a scope?  Here I used a small piece of 1/16" rod for the body of the scope.  I cut that to the overall length I wanted for the scope.  I used 3/32" tube for the front and rear scope rings as well as a centerpiece for the dials.  The rear scope ring was cut at a 45 degree angle for aesthetics.

The front scope hood was made with a small piece of 1/8" tube which had been drilled out to a 3/32" diameter and cut at a 45 degree angle.  You could make this longer if you wished, or even add another step up with a piece of 3/16" tube.
The adjustment dials are small discs cut off the end of 3/36" rod.

This looks great as is, but it's still missing something don't you think?

Bipod

I grabbed a small scrap piece of .5mm styrene sheet and used my hobby knife to cut out a bipod.  This part was pretty simple.  You could make one longer or collapsed if you wish.  The only part of this which was measured was the notch at the top.  That was cut to fit the bayonet lug on the bottom of the lasgun.

Finished

There it is. All done. Using these simple materials and tools there are many different possible variations all at your fingertips.


Sunday, February 9, 2014

Hobby Progress - Imperial Guard - Catachan Regiment

I have a tendency to purchase more plastic crack than I can possibly finish at any given time.  That isn't such a bad thing considering how distracted I get by random new projects.  I spent this last week getting some of my Catachan army completed.  All models were painted with a combination of GW, generic craft paints, and Army Painter paints and washes.
Imperial Guard Commissar with Plasma Pistol
The above commissar was missing his left arm when I got him in some bits I had ordered from ebay.  I fixed that with a generic Cadian arm, a chainsword, and for the epaulette, some green stuff.

Catachan Lieutenant

Imperial Guard Commissar

Catachan Heavy Bolter Team

Catchan guardsmen with lasguns and meltagun

Catachan Captain with Powerfist and Boltgun

left: custom 'Sly' Marbo   Right:  Catchan guardsman with plasma gun
I'm thinking about painting Marbo's berrett red to keep with the theme of the Catachan 2nd regiment.

three catachan missile teams
The sandbags for the missile teams and the heavy bolter team are resin casts of some sandbags I made a long time ago out of super sculpey.

Saturday, February 1, 2014

Chapter House Studios - Chimera Wheeled Conversion Kit Review


UPDATE: Click here to see the finished product.

After the release of the Codex: Inquisition I knew I wanted to build a show quality Inquisitorial Chimera.  In order to achieve the standout quality I was looking for I knew I was going to be adding some aftermarket bits to the standard Chimera from Games Workshop.  I chose the Chimera Wheeled Conversion Kit from Chapter House Studios.


At $18.50 it was priced right for the size of the kit.  And at first look is well cast and had very little flashing and only one very small bubble on one wheel, which will be hidden from view when completed.

The master model was clearly a 3D print which was polished up with a little putty and sanding.  That being said there are some parts along the top edge where either the master model wasn't cleaned up very well or they have some serious lines in the mold.

These lines where not easy to clean up and required a bit of "carving" with my x-acto knife to bring back in line with the rest of the model.  I had to be very careful not to remove the rivets.

I had already read reviews of this kit at Codicium Aeternum and WarFrog's Hobby Blog so I knew that there was going to be some work involved.  Both of them complained in their blogs about the poor fit of the kit.  This had been explained by Chapter House representatives as a result of the conversion being designed for the older Chimera model.  While it can still be used on the new model without any modifications, it just looks a bit off.

Taped into position the asymmetry of the kit becomes apparent.  This also created an odd ridge along the sides of the rear hull where the kit extended over the model edges by about 1.5-2mm.  I didn't grab a picture of this but it can been seen to some extent on the Chapter House website, as can the rest of the perceived misalignment discussed here and in other reviews.

Given that this kit is shown on the Chapter House website assembled just as it would out of the box, it is my impression that they're choice was one of aesthetics.  And while I prefer WarFrog's finished version to that shown by Chapter House.  I think mine is going to fall somewhere in between.

For persons like myself, who are hobbyists first, gamers second, this kit will require some skills to assemble/modify in a way which is pleasing to the eye and satisfying to our level of perfection.  For those with fewer hobby skills the kit will still work out of the box, will still make your model a unique addition to your army, just understand that it will look like an aftermarket kit when finished.

Right about now you may be wondering where my pictures are of the modifications and finished product.  Well that will come later in my Inquisitorial Chimera build posts.  I couldn't just order the Chapter House kit and call it a day!  I've got some Forgeworld, some scratch built and what I think will become one of my future product lines in the works for this.  Stay tuned.


Monday, January 6, 2014

Space Wolves Rhino - WIP Interior

Picked up a rhino kit a little while back and broke it out this last weekend.  I've finished the interior and added the base coat to the exterior.